Introduction
With Reltio now supporting the RELTIO_JSON format for Data Loader jobs, there’s a powerful new way to ingest data. The Console Data Loader UI doesn’t support this format yet, so in this post I’ll show how to load RELTIO_JSON quickly and princiefficiently using simple, API‑driven methods. We’ll walk through a step‑by‑step process for files stored locally or in cloud storage (AWS, Azure, GCS).
Why Use RELTIO_JSON for Data Loader?
If data from the source systems can be converted to the Reltio JSON format by the integration layer, this option can provide many advantages over the other supported file types ( e.g. CSV, standard JSON etc.) which helps reduce the setup related activities and accelerate throughput.
- No Mapping Needed - RELTIO_JSON loads don’t use mapping.. So, we can skip building and maintaining column to attribute mapping. This means one less component to maintain and migrate. And it makes the job definitions simpler as well.
- No Intermediate Table Flattening - Unlike CSV/standard JSON (which Data Loader flattens to tables before ingest), RELTIO_JSON goes straight in via the API. No flattening or transformation required.
- Designed for Large Volumes - Because no transformations are required, the RELTIO_JSON format performs really well for the large volume data loads.
Sample RELTIO_JSON
Before we start, here’s a minimal example of an Organization entity in RELTIO_JSON format:
[
    {
        "type": "configuration/entityTypes/Organization",
        "attributes": {
            "Name": [
                {
                    "value": "ABC Corporation"
                }
            ],
            "Phone": [
                {
                    "value": {
                        "Type": [
                            {
                                "value": "Business"
                            }
                        ],
                        "Number": [
                            {
                                "value": "XXX-XXX-XXXX"
                            }
                        ]
                    }
                }
            ]
        },
        "crosswalks": [
            {
                "type": "SourceName",
                "value": "Org_12345",
                "createDate": "2025-08-22T17:48:36.866Z",
                "updateDate": "2025-08-22T17:48:36.866Z"
            }
        ]
    }
]
Loading RELTIO_JSON using Data Loader
You can load RELTIO_JSON from local storage (your computer) or from cloud storage (AWS S3/GCS Bucket/Azure BLOB). The overall steps are the same:
-
Create a Job Definition (a Data Loader Project)
-
Run the Data Load job
-
Monitor the job
Create Job Definition for RELTIO_JSON file
Create Job Definition (Local file)
STEP 1 - Create Storage ID
The first step for loading a RELTIO_JSON file from your local computer is to create the storage id for the file that we want to load. Follow the below steps
STEP 2 - Create Job Definition or Data Loader Project using API
Now that we have the storage ID for our RELTIO_JSON file, we can use the storage id to create the data loader job definition i.e. project for our file. The following API needs to be used for this step.
HTTP Method: POST
curl --location 'https://361-dataloader.reltio.com/dataloader/api/{{mdmTenant}}/project' \
--header 'Authorization: Bearer {{AccessToken}}' \
--header 'Content-Type: application/json' \
--data '<<Enter JSON Data Here>>'
Sample JSON request Body
{
    "name": "SAMPLE_RELTIO_JSON_LOAD_FROM_LOCAL_STORAGE",
    "progressStatus": "Completed",
    "environment": "{{env}}",
    "tenantId": "{{mdmTenant}}",
    "checkForUpdates": true,
    "updateType": "UPDATE_MERGED",
    "loadType": "ENTITIES",
    "additionalAttributes": {
        "alwaysCreateDCR": false,
        "acceptFileType": ".json",
        "executeLCA": false
    },
    "storageDetails": {
        "storageId": "55e265e5-4327-42f2-8572-f5360feba114",
        "fileType": "RELTIO_JSON"
    }
}
API Documentation - https://developer.reltio.com/private/swagger.htm?module=Data%20Ingestion#/Data%20Load%20Job/createProject
Key properties of the JSON body
| Property |
Description |
| name |
Name of the Project. Change it as needed. |
| environment |
Environment name for your mdm tenant e.g. test-usg |
| tenantId |
MDM tenant id |
| updateType |
Keep it as UPDATE_MERGED |
| loadType |
When loading entities : ENTITIES
When loading relationships : RELATIONS
|
| additionalAttributes.acceptFileType |
.json |
| storageDetails.storageId |
The storage id generated in the previous step. |
| storageDetails.fileType |
Hardcode to RELTIO_JSON |
If the API is executed successfully, it will return a response like below
{
    "createdBy": "user",
    "createdDate": 1757504406535,
    "id": "aa9ad03f-4720-46e7-a3d1-9473d5f76485",
    "name": "SAMPLE_RELTIO_JSON_LOAD_FROM_LOCAL_STORAGE",
    "progressStatus": "Completed",
    "environment": "test-usg",
    "tenantId": "{{mdmTenant}}",
    "checkForUpdates": true,
    "updateType": "UPDATE_MERGED",
    "loadType": "ENTITIES",
    "additionalAttributes": {
        "alwaysCreateDCR": false,
        "acceptFileType": ".json",
        "executeLCA": false
    },
    "storageDetails": {
        "createdBy": "user",
        "createdDate": 1757503237000,
        "updatedBy": "user",
        "updatedDate": 1757504406466,
        "storageId": "55e265e5-4327-42f2-8572-f5360feba114",
        "shareSourceInfo": false,
        "bucketName": "reltio_customer-facing_dataloader",
        "sourcePath": "{{mdmTenant}}/247d8d9b-744c-44ea-ac5c-e9f234e1f067/ORG_RELTIO_JSON_Sample_blog.json",
        "delimiter": ",",
        "storageAccount": {
            "createdBy": "user",
            "createdDate": 1757503237000,
            "updatedBy": "user",
            "updatedDate": 1757503238000,
            "accountId": 1165477,
            "accountName": "ORG_RELTIO_JSON_Sample_blog",
            "accountType": "UPLOADED"
        },
        "totalRecords": 1,
        "fileType": "RELTIO_JSON"
    }
}
As we can see from the sourcePath, the job is pointing to the file we are trying to load. Now, copy the id from the response. This is the job definition Id i.e. the project Id that we will use to execute the job.
Create Job Definition (Cloud file)
In this section, we will explore to create the data loader job definition for the RELTIO_JSON file when the file is available in a cloud storage location like AWS S3, Google Cloud Storage Bucket or Azure Blob Container. For this blog, I am using AWS S3 to store the RELTIO_JSON file and read the data. But the same principle will apply for other storage locations as well. So let's dive right in.
STEP 1 - Connect to S3 bucket from the Console data loader and get Credential String
For loading the Reltio json files for a cloud storage location like AWS S3 bucket, we need a credential string that will then be used to create the subsequent job definition. The easiest way to do this to create a dummy job definition by connecting to the S3 bucket from the console data loader. And then use the genrated credential String for API calls. Perfrom the following steps to create a dummy job definition and the credentials String.
- Login to the Data loader console from Reltio and start creating a new data loader job as explained in the previous section.
- Select AWS S3 as the source file location, provide your bucket information accordingly. Both access Key, secret keys and AWS IAM role based authentication is supported.
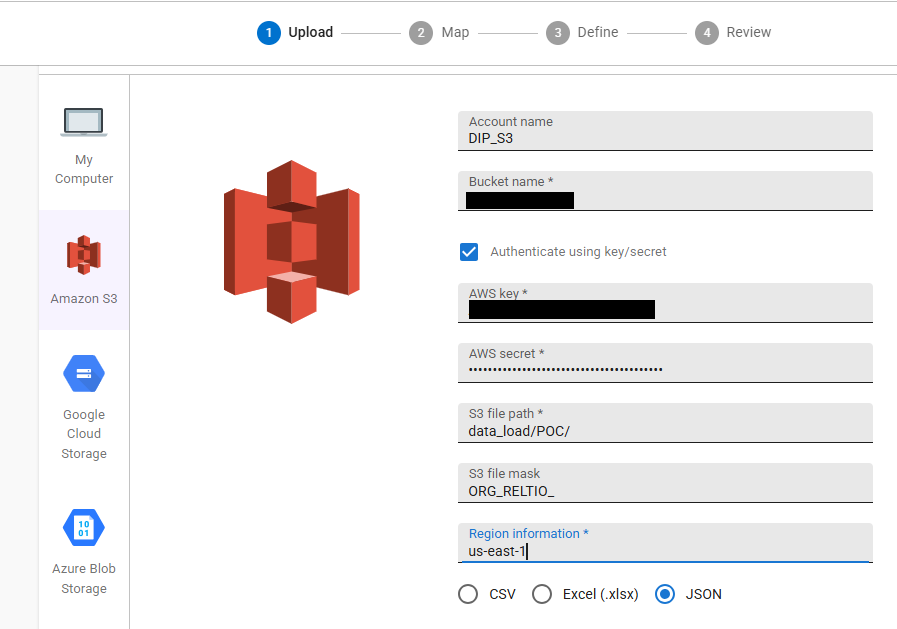
Refer to the documentation - Load entities into a tenant | Reltio for more information about each property in the screenshot.
Note: If your org requires IAM role–based access, configure the role and trust policy, then use that option in the Console. Refer to the documentation Configure an AWS IAM role for Data Loader for more information about creating AWS IAM role for data loader.
- Click Next, and you will be redirected to the mapping page. Map the crosswalk and 1-2 attribute until SAVE AS DRAFT option is enabled and then save the job definition. This process is same as the previous section.
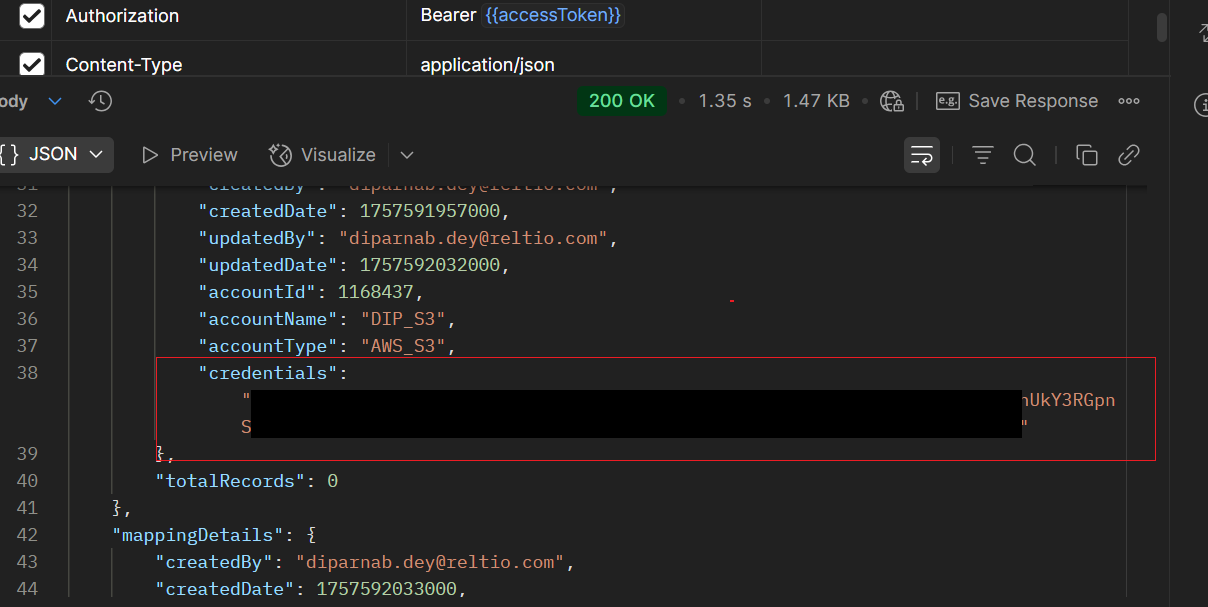
- Copy the Job definition id from the data loader console and trigger the Get Existing Job Definition API as explained in the previous section.
- Copy the credentials String returned in the response. This will be used in the subsequent job definition creation.
STEP 2 - Create Job Definition using API
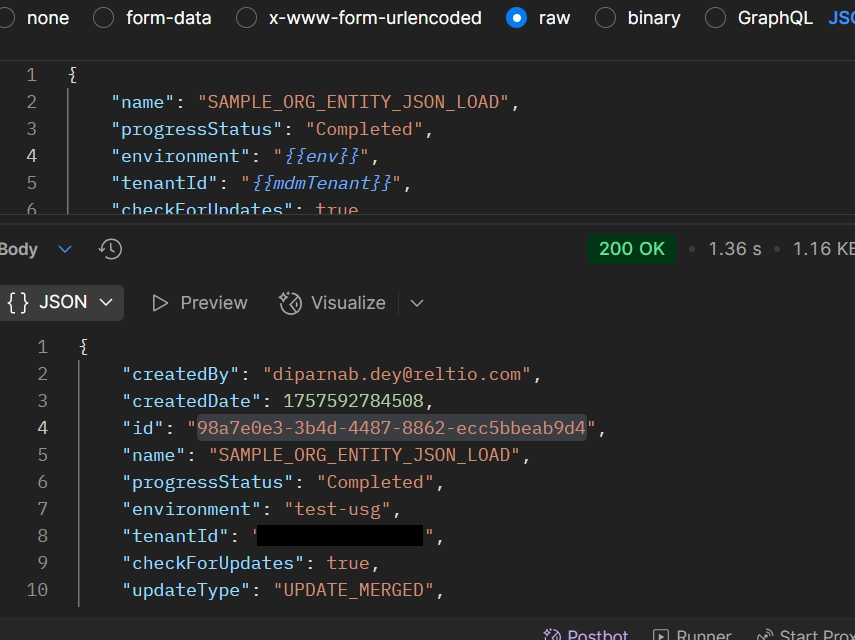
Now, we have the credentials String and we will have to create the job definition using the API https://developer.reltio.com/private/swagger.htm?module=Data%20Ingestion#/Data%20Load%20Job/createProject for our relevant RELTIO_JSON file(s) from the S3 bucket. Use the same cURL as shared in the previous section. But the body will differ a little.
{
    "name": "SAMPLE_ORG_ENTITY_JSON_LOAD",
    "progressStatus": "Completed",
    "environment": "{{env}]",
    "tenantId": "{{mdmTenant}}",
    "checkForUpdates": true,
    "updateType": "UPDATE_MERGED",
    "loadType": "ENTITIES",
    "additionalAttributes": {
        "alwaysCreateDCR": false,
        "acceptFileType": ".json",
	 "executeLCA": false
    },
    "storageDetails": {
        "shareSourceInfo": false,
        "bucketName": "<<ENTER S3 BUCKET_NAME>>",
        "sourcePath": "<<ENTER FILE PATH IN THE S3 BUCKET>>",
        "fileMask": "<<ENTER FULL FILE NAME OR FILE PREFIX>>",
        "fileType": "RELTIO_JSON",
        "storageAccount": {
            "accountName": "<<ENTER A STRING TO INDICATE ACCOUNT_NAME>>",
            "accountType": "AWS_S3",
            "credentials": "<<ENTER CREDENTIALS STRING FROM PREVIOIS STEP>>"
        }
    }
}
This API , if successfully executed, will generate the Job definition that we need to use for loading the data. Copy the id from the API response.
Run the Job
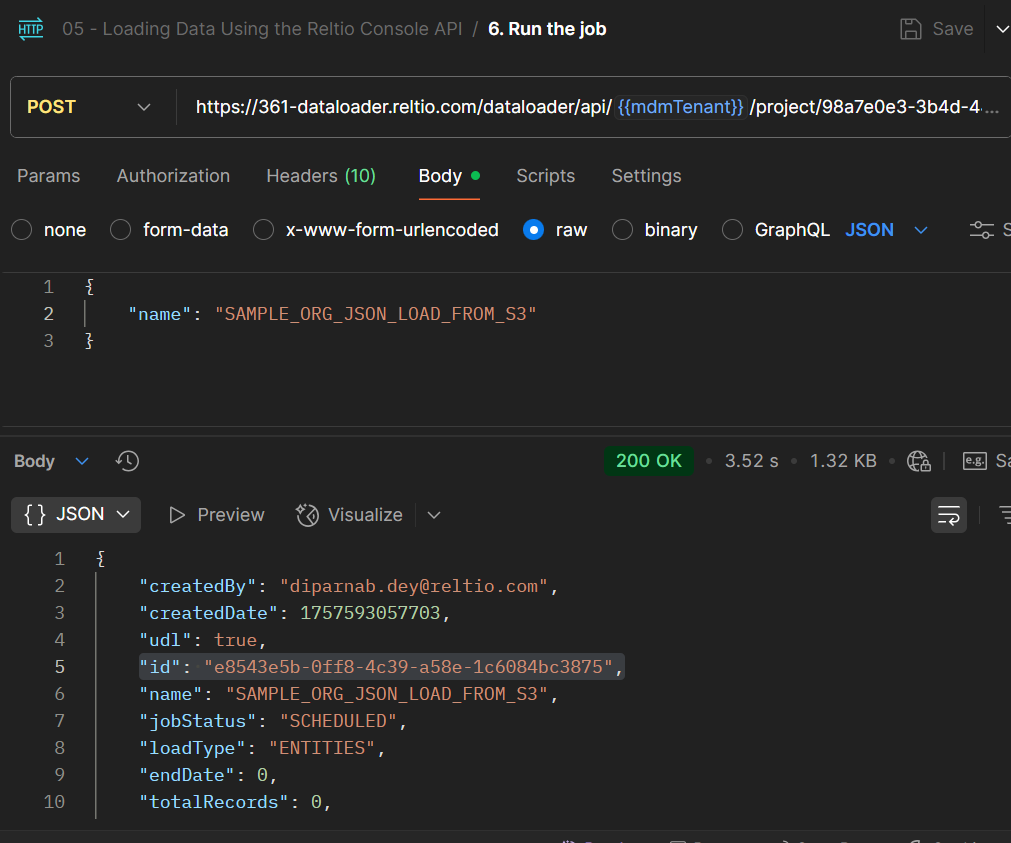
We have created the job definition for the file. Now, the next step will be to run the job which will trigger the data load. The following API needs to be used to run the job.
HTTP Method : POST
curl --location 'https://361-dataloader.reltio.com/dataloader/api/{{mdmTenant}}/project/{{JobDefinitionId}}/jobs/run' \
--header 'Authorization: Bearer {{accessToken}}' \
--header 'Content-Type: application/json' \
--data '{
    "name": "<<Enter Job Name Here>>"
}'
Here,
- mdmtenant is the Reltio MDM tenant id.
- JobDefinitionId is the Job definition id/project id creatd in the previous step.
API Documentation - https://developer.reltio.com/private/swagger.htm?module=Data%20Ingestion#/Data%20Load%20Job/createJobAndRunJob
This process will create a job and execute it. The ‘Id’ present in the response is the Job ID.
Monitor the Job
We can monitor data load progress in the Console UI or via API.
Using Console UI
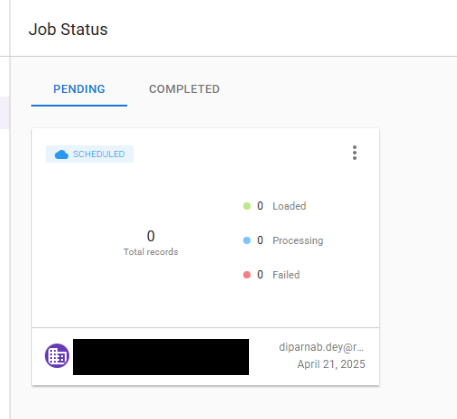
Once the job is triggered, it will show up in the PENDING tab under the Job Status in the Console data loader UI. We can track the progress of how many records has been processed/failed from here.
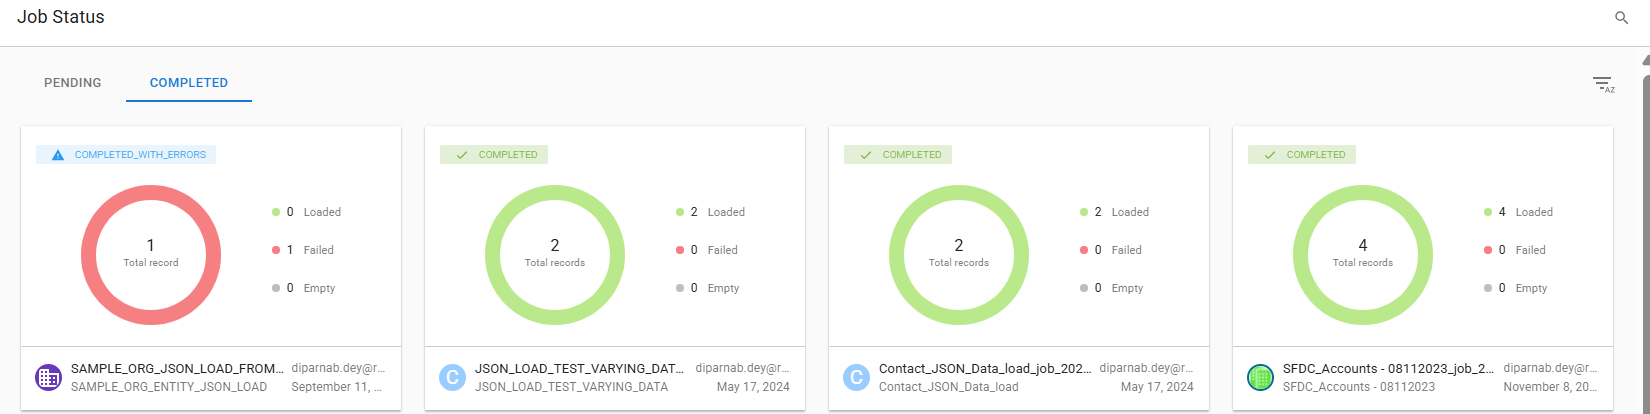
Once the load is completed, the job will move to the COMPLETED tab and the completion status and the load stats can be tracked there. Refer to the following screenshot for an example:
Using Data Loader API
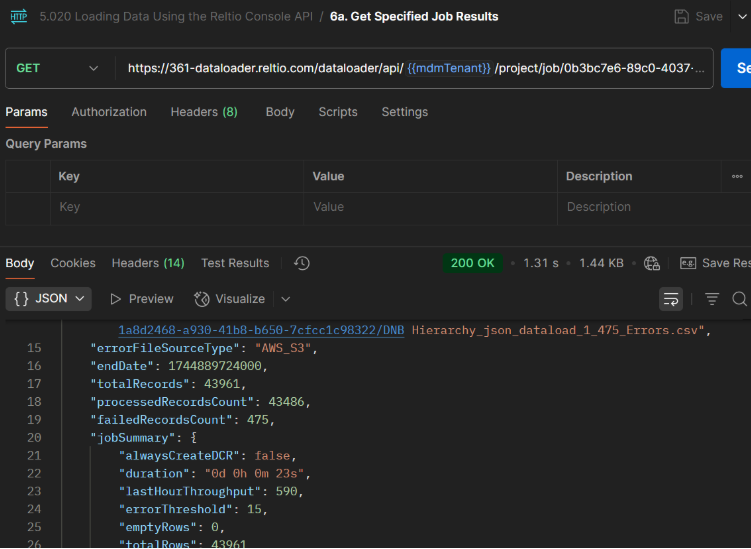
We need to execute the the following API with the Job ID created in the previous step.
HTTP Method : GET
curl --location 'https://361-dataloader.reltio.com/dataloader/api/{{mdmTenant}}/project/job/{{jobId}}' \
--header 'Authorization: Bearer {{accessToken}}' \
--header 'Content-Type: application/json'
Here jobId is the id of the job we created in the previous step.
API Documentation - https://developer.reltio.com/private/swagger.htm?module=Data%20Ingestion#/Data%20Load%20Job/getJobDetailsById
This endpoint returns job metadata and statistics (processed/failed counts, duration, throughput), plus links to error file locations. Use this to reconcile load results or to automate post‑load checks.
Data load Jobs can complete successfully, or some records may fail due to various reasons like data issues, system errors, configuration issues etc. Build a lightweight workflow to programmatically fetch Data Loader error files, review and triage errors, and reprocess what’s fixable. For an end-to-end tutorial on retrieving error files via API, I recommend my colleague, Gino Fortunato’s post: Guide to Accessing Reltio Data Loader API.
Conclusion
RELTIO_JSON offers the most direct, transformation-free path to load data at scale with Data Loader. Until the Console UI supports this format, the API flow outlined here—create the project, run the job, monitor the results—provides a clean, repeatable pipeline from local or cloud storage. If your integration can emit RELTIO_JSON, you’ll skip mapping, avoid flattening, and improve throughput. Use this guide to implement the steps and streamline your data-loading workflows with confidence.
#Blog
#Featured